Monday, December 22, 2008

Angel Wings

angelwingsfinished

I made up this pattern because I couldn't find a single angel pattern on Ravelry with wings of this traditional shape - just ruffles or bow-tie shapes. These wings can be sewn on any angel or doll of the right size.

Can be made with any size yarn, with hook to match. Sample uses worsted-weight acrylic and US 8 (5mm) hook; each wing is about 2 inches tall.

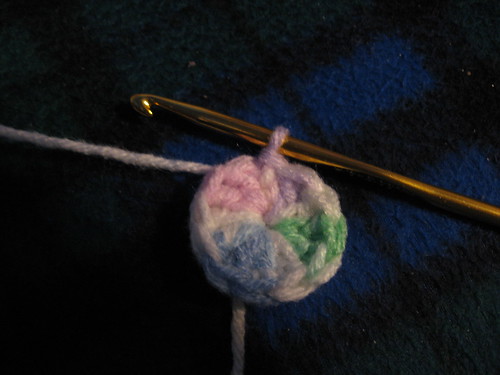
Chain 5, join with slip stitch to form ring. Ch 2, turn. Work 11 double crochets (American) into ring over yarn tail, join with sl st into top ch. Pull on yarn tail to snug up the "wheel". Work should now look like photograph A below. This is the top rounded part of the angel wing.

angelwings1

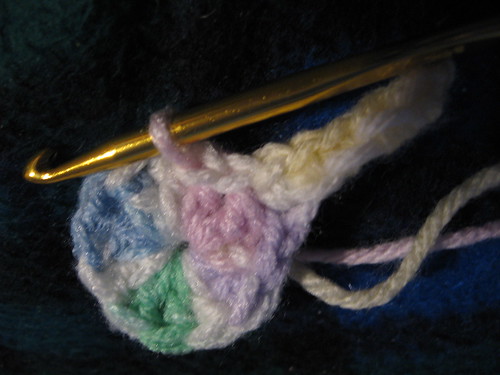
Now chain 7. Hold the work with the wheel on the left, chain at the bottom right, so that it looks like photograph B below - the Vs all point in the same direction, wrapping around the wheel. This makes a much prettier edge than if there was a sharp bend between wheel and chain.

angelwings2

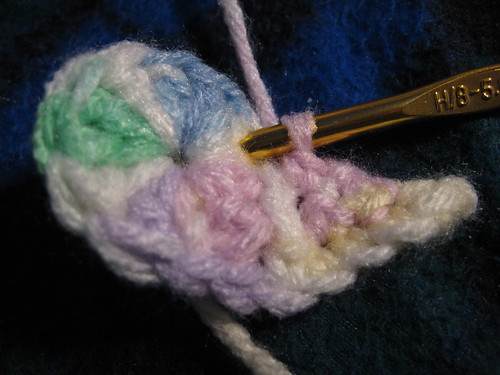
Single crochet (American) into 2nd ch from hook, then sc into next 4 chs for a total of 5 scs. Join to "wheel" with sl st, between the first and second dc up from where the chain joins - photograph C below shows the crochet hook inserted and ready to make the sl st.

angelwings3

Now sl st between the second and third dcs up from the chain - that is, into the gap between dcs just above the gap you worked into in photograph C. This is the equivalent of a turning chain, moving the working yarn up to where you need it for the next row. Work should now look like photograph D below (which looks a little drunken because I had to take it upside down to show what I wanted to show). Turn.

angelwings4

Now look at what is now the back of the work - the side shown in photograph D above. Just below the hook is a whole row of little V-chain-like things. The top two are those slip stitches you just made - ignore them. The third one is a single crochet - skip that. Sc into the next one, the second sc from the wheel, which is the fourth little V-chain from the hook. Got that?

Now insert hook into third sc, draw up a loop, then into 4th sc, draw up a loop, now yarn over hook and draw through all 3 loops on hook. You have decreased one st. Ch 1, turn.

Sc into second sc from hook - that is, the one right next to the wheel. Sl st into the gap between the third and fourth dcs from where the chain joined the wheel - this may be a little hard to actually count, since there's no visible jog between chain and wheel now, but it's right next to where your hook is anyway at this point. Photograph E below shows the hook inserted in the correct place.

angelwings5

Cut the yarn and pull the end out, turning that last sl st into a "finish off". Weave in ends.

This pattern copyright December 2008 Maria Grace McClamrock, aka "telcontar" on Ravelry.

Monday, August 25, 2008

Knitted Mesh Backpack Pattern

mesh backpack, full of books

US 8 straight needles.
5 oz Red Heart Super Saver yarn--yeah, I know all the other bag patterns say "cotton", but this is my book bag. I want indestructible. I used the Sunshine Print colorway.
Crochet hook, whatever size you prefer (I used a G because that's all I have).

These instructions give about a 12"x12" backpack, empty. It'll stretch quite a ways, so don't make it too big if you don't want lumbar problems.

Cast on 39 sts using long-tail cast on; purl one row. (This gives a sturdier edge.)

Row 1: *K2tog, yo; rep from * across, end k1.

Row 2 and all WS rows: purl.

Row 3: K1, *yo, k2tog; rep from * across.

Work in patt till piece measures 24" long. Use this stretchy bind-off: k1, *yo, pass k st over yo, k1, pass yo over k st; rep from * to end. Do NOT cut yarn or fasten off.

Place last loop on crochet hook. Fold piece in half, placing CO and BO edges together. Crochet side edge together; I used the following method, which produces a good stretchy edge.

*Sc in hole below CO edge. Ch 1. Sc in hole below BO edge. Ch 1. Rep from * down, alternating sides and placing 1 sc in each hole along edges, with a ch between each one. It'll look a little bulgy when the bag is empty, but believe me, you'll need the flexibility when you fill it.

mesh backpack, flat

When you run out of holes to single-crochet in, do NOT fasten off; ch 1, turn. Work 7 single-crochet sts back along joined edge--spreading them out more than normal is a good idea. Ch 1, turn.

Work even in single crochet over these 7 sts until strap measures about 12-14 inches. When it's long enough, fasten free end of strap to CO edge by crocheting into strap and CO edge at the same time.

Before fastening the strap, you need to be sure it's twisted the right way; it's hard to explain. Hold the backpack against your back as if you're wearing it, and make sure the strap lies (more or less) flat against your body all the way up.

Once the strap is attached, you can finally fasten off, leaving a nice longish end to weave in--remember, this critter is going to take some hard wear. You don't want the strap giving way because your fasten-off came undone.

Now join the yarn at the other top corner, on the side you haven't seamed up yet, and repeat the whole process from "Crochet side edge together", way up ⇑ there. Weave in those two ends, and you're done!

You can make an iCord drawstring if you want, especially if you'll only be carrying light loads, but you don't really need it. This is a very well-behaved backpack.

mesh backpack, bundled up

To bundle it up like this picture, with a handy loop to hang it from your bike handlebars, just fold it in half--either way, doesn't matter--then roll it up so the long edge curls around. (How am I supposed to describe this stuff? sigh...) Twist one strap around it, rather like a ponytail elastic, and the other strap forms the loop.

Copyright (insofar as a mesh bag pattern can ever be copyright) August 2008 by Maria Grace McClamrock, aka "telcontar" on Ravelry.

Sunday, August 24, 2008

Mitered-Square Baby Bonnet

bonnet_on_dog

Okay, this dog was not inconvenienced in any way in the taking of this picture. When I actually photographed the bonnet, my Styrofoam skull GK was wearing it. However, several people have asked me to change the picture, so Kate (propertrappings on Ravelry) kindly Photoshopped me this doggie picture. There will hopefully be a proper baby picture at some future date...

This bonnet is worked from side to side, using mitered-square shaping. The ruffle is crocheted on afterwards.

Yarn: About 1.75 oz of Bernat Super Value or other worsted-weight yarn. Needles: US 8 DPNs and straights. (Note: KnitPicks Options needle tips in the appropriate size make great DP substitutes!) Hook: I used a G because that's what I had. Use whatever size works for you with your yarn.

Measure recipient's head, under the chin, over the ears and top of the head. Babies have incredibly large heads, so don't skip this step! Sample sizing is given for a 17-inch measurement, with basic instructions to adapt.

CO 3 sts on DPNs. Work iCord for 6-8 inches. Mark middle stitch.

Row 1 and odd-numbered rows: K to just before marked st, e-loop inc, k marked st, e-loop inc, k to end. (Those familiar with the ubiquitous Baby Surprise Jacket will recognize this procedure. They will also recognize that I can't even think "Baby Surprise Jacket" without going all Elizabeth Zimmermann in my language. sigh...)
Row 2 and even rows: Knit.

Work mitered square as established till centerline measures 5 inches (or a little less than 1/3 of baby's head circumference, as measured above). Work even in garter st for another 5 inches (or another 1/3 of head circumference). Mark middle st.

Odd rows: K to 1 st before marked st, sl 1, k2tog, psso, k to end.
Even rows: Knit.

Work mitered square as established till 3 sts remain. Work iCord on these 3 sts till length matches first iCord. Bind off and weave in ends.

With crochet hook (duh--what else would you crochet with? sorry) join new yarn and work 1 double-crochet in every garter ridge. Ch 3, turn.

Work dc in base of turning chain. Work 2 dc in every dc across. Ch 1, turn.

Work ruffle edge, 1 st in each st below, in this patt: single crochet, *double crochet, triple crochet, double crochet, single crochet, rep from * across. It won't quite come out even--fudge it! Fasten off and weave in the end.

Put it on the baby in question. I promise you, it'll look cuter than it does on GK the Skull.

Oh yeah--this pattern copyright August 2008 by Maria Grace McClamrock, aka "telcontar" on Ravelry, aka "Maria Grace" on the Ravelry Designers.

Friday, August 8, 2008

Ravelympics on YouTube!

Okay, I admit it--I'm posting this mainly because the music is so awesome! If anybody knows what that music is, will they please tell me?

Friday, August 1, 2008

Lego Knitting Machine

This is the most utterly incredible contraption I have ever seen--a motorized I-Cord knitter built entirely out of Legos. Somebody posted a link to the video in the GeekCraft group on Ravelry this morning, and I just had to blog it.


Friday, June 6, 2008

How to Design a Self-Striping Argyle Scarf

You may have seen my green-and-purple "Self-Striping Argyle Scarf". (Sorry, I don't know how to link the post with the picture, and Flickr is prejudiced against letting me blog the same pic twice.) Here's how to make your own with any self-patterning yarn you have on hand.

Swatching (yes, you must swatch):
Cast on a convenient number of stitches, a multiple of 4, minus one--I use 11, since it's easy to multiply by. Find the exact point in the color-pattern repeat where the working yarn meets the cast-on stitches; this is hard to explain but easy to point out. It might be "just before the purple meets the green", for example.

Mark this spot in the next color-pattern repeat, so that you have exactly one repeat marked off; a small hair barrette or alligator clip is good for this.

Now work in Mistake Rib--*k2, p2, rep from * across, end k2, p1. Try to keep your tension constant. When you've knitted up the single color-pattern repeat you had marked off, calculate the number of stitches it took. For your scarf, you'll cast on slightly less than half that number--the exact number of CO stitches can take some trial and error.

Example:
I swatched a yarn with 88 stitches to the color-pattern repeat. Casting on 43 stitches produces a scarf with the color stripes stacked vertically, no diagonal movement.

Casting on 39 stitches gives an extremely slanted diamond pattern--you may like this look, or you may not.

41 cast-on stitches changes the Mistake Rib pattern a bit; it now ends just k1. I found 41 stitches to give nicely proportioned argyle diamonds.

Obviously, this all depends on your specific yarn. If you have a very short pattern-repeat, you can experiment with casting on a whole repeat's worth of stitches, 1.5 repeats, or even two. (Let me know how it turns out.) Very long pattern-repeats, such as are found in Kauni or Noro yarns--don't even bother. The pattern depends on having at least two different colors in every row.

You can try this technique in ordinary 2x2 rib, of course; I use Mistake Rib because it doesn't gather in as much, so you can see the whole argyle pattern, and also because I like the way the purl-bumps in Mistake Rib break up pooling and make the colors "sparkle".

Saturday, March 22, 2008

Guideposts Surprise Sweater

circular Guideposts sweater

This is the "Guideposts Surprise Sweater" I've been working on for a while--it's based on the Classic T-Top Sweater pattern from Guideposts magazine's Knit for Kids Project, altered to work completely in the round. I made the smallest size, since this was a test run. Here's the basic instructions:

Cast on twice the number of stitches the pattern lists for the size you want. Work in garter stitch for 10 rows. Work in stockinette to appropriate length. Place end-of-round marker, and 4 other markers--two of them 1 stitch away from end-of-round marker. The other two should each be 1 stitch away from the exact middle of the round.

Work in garter stitch (which, in the round, is "knit 1 row, purl 1 row"), increasing 1 stitch on both sides of each marked stitch every other row for a total of 8 sts increased every 2 rows. You must use mirrored e-loop or lifted-stitch increases--knit-front-and-back is too one-directional and produces a badly twisted sweater.

To rephrase the above increase instructions, in hopes that my readers can figure out what I mean one way or the other: On knit rows only or on purl rows only--your choice--do two mirrored increases by each marker except the end-of-round marker. One increase on either side of the marker.

When the garter-stitch portion of the sweater is large enough for the size you're knitting, bind off beginning at end-of-round marker. Cut yarn. The sweater will now look something like this:

Guideposts Surprise Sweater pre-folding

Fold the garter-stitch portion so it looks like the picture at the top of this post. With separate pieces of yarn, sew up shoulder seams. Weave in all ends.

Note: If some enterprising seam-hater wants to try three-needle bindoff on the shoulders, be my guest. Personally, I think it's impossible to do without breaking and rejoining the yarn way too much.

Wednesday, March 19, 2008

Itty Bitty Fire Brigade

Humorous Pictures
see more crazy cat pics

MacGyver Returns


Okay, this is the YouTube recording of a commercial that Richard Dean Anderson (aka MacGyver) did for MasterCard a few years back. Since I've been watching MacGyver lately, I just thought it was hilarious!

By the way, I found it from Ravelry, in the brand-new What Would Mac Do? group. Which, no, I didn't start--just suggested that somebody else should.

Saturday, March 15, 2008

Banana Berry Sock


Banana Berry sock
Originally uploaded by telcontar328

This is my first sock. My friend Hilary (FreezerFairy) adapted the pattern for worsted-weight yarn--it worked perfectly, except that the Red Heart Super Saver really chews up my feet! So I'm doing another one, with the foot in Bernat Super Value (much cuddlier), and just the cuff in RH SS. No photo yet, though.

I also have to use a stretchier bind-off on this next one. I can barely get the pictured sock on! But Vicki (SimpleKnits) and Anita (TheFiberArtist) both suggested stretchy bind-offs, so I'm good to go.

The cuff is so long because I like knee socks--while I have short legs, they're so thick that the cuff gets significantly shorter when I put it on!

Knitting Scout Badges

Holy cat, I haven't blogged in almost a month! Well, I've had better things to do, LOL--mostly Ravelry. Not to mention my computer was down for ages.

Did you notice my Knitting Scout badges, right under my profile? Want some of your own? Here's the link!

I'm going to insert a couple of the badges I haven't earned yet in this post and talk a little about them.


(Whoa, that's large.) To the left, you see the MacGyver Level III badge, which requires the recipient to "demonstrate clever use of a knitting tool in a non-knitting-related scenario working towards the Greater Good." Still working on that.


This next one is the "I've Knit Items With No Conceivable Practical Application". As you can see, it features a three-legged pair of tights; another example, mentioned on Ravelry, is felted jellyfish. I probably shouldn't be working toward this one, but... well, let's just say I like a challenge. As demonstrated by my first two MacGyver badges, I can come up with a use--not necessarily a practical use--for almost anything. So knitting something useless in my own estimation could get pretty stiff.

Sunday, February 17, 2008

Spring is Sprung!


Banana Berry/Jonquil hat
Originally uploaded by telcontar328

This is just a wonderfully springy hat. I made it for The Ships Project, from Ellen's Basic Knit Hat Pattern, striping two colorways of Red Heart Super Saver--Bright Yellow solid and Banana Berry multi. They blended perfectly, and the yellow just livened up the whole effect. Sorry, I can't talk coherently right now!

Oh yeah--I knitted it flat and seamed it up to avoid jog problems.

Saturday, February 9, 2008

... and is Huge Gut ever proud!


... and is Huge Gut ever proud!
Originally uploaded by sixes & sevens

oh, I had to blog this... met it on a flickr pool I clicked thru to from ravelry... can't stop laughing!

Bob loves good hardware- yum!


Bob loves good hardware- yum!
Originally uploaded by frecklegirl

Okay, this is the Boston Terrier whose two humans run Ravelry, the crafters networking site. I admit that I went through all the Flickr pictures of him, in slideshow, before I could pick one to blog.

About Ravelry--it's members-only right now, because they only have one guy (Casey the Code Monkey) to keep up with everything. To become a member, you follow this hyperlink, then put your name on the waiting list. After a week or two, you will get an e-mail with a link which you follow to set up your account.

Once you are a Raveler, you can:
List your Finished Objects, Works in Progress, Hibernating, and even your Frogged projects--with pictures, hosted on Flickr!

Catalogue your Stash--also with pics, if you care to take them. A lot of people do.

Catalogue your knitting needles and crochet hooks (no pics yet) and your knitting/crocheting library (with not only pre-loaded pics, but Table of Contents!)

Look at other Ravelers' Finished Objects, Stash, etc... if you are thinking of using a particular yarn or pattern, you can look at what everybody else has done with that exact yarn/pattern, and see what they thought of how it worked!

Queue up future projects you hope to make someday, with just a click of a button--many people's queues are longer than their lifespans.

Find knitting groups in your area, or find other Ravelers who share your interests--anything from JRR Tolkien to Rachael Ray's cooking show to the LA Dodgers!

Link to all your friends, and see their "recent activity" with the click of a button!

Chat with other crafters on some very active forums, about everything from bona-fide knitting problems to Random Sleep Outbursts and the Four Laws of Knitodynamics (both recent threads in the Remnants forum.)

Link your projects to your blog. If you've written original patterns and posted them on your blog, or anywhere else other people can find/buy them, you can even sign up for free to be a Designer, and other people can queue up your patterns!

"Favorite" projects, patterns, stash, yarn brands, designers, forum posts, and even advertisements so you can find them when you want them!

Okay, I'll shut up now. This is not a paid advertisement, or even an unpaid advertisement, just a gush from a random Raveler.

Happy knitting!

Sunday, February 3, 2008

Captain America Sweater


Captain America Sweater
Originally uploaded by telcontar328

Okay, this is the official Pattern and Photo post.

Read all instructions before beginning. I'm afraid they may be a little jumbled. If you can't make sense of something, leave a comment!

Size: Boys' 8. (Upsizing should be easy--I include all pertinent measurements.)
Gauge: 16 stitches to 4", 23 rows to 4", using worsted-weight yarn and US 9 needles.
Yarn:
Red Heart Super Saver in White, Cherry Red, and Royal.

Vertical stripes:
With red yarn, CO 36 sts. (CO row will run from bottom of armhole to bottom edge of sweater. Sweater shown has a 9" CO row.)

Work as follows:
Row 1: K across
Row 2: K 8, P to end
AT THE SAME TIME working in color pattern: 10 rows red, 10 rows white
until work measures about 28". Finish with 10 white rows. (Length of work will run around waist circumference of wearer. Sweater shown has 16 stripes.)

Sew or graft end of work to CO edge.

You now have a ring of striped stockinette stitch with garter-stitch "ribbing" along one edge. Lay it flat with seam/graft at one edge, to fall under armhole, unless it's totally invisible or you don't care.

Yoke:
Using blue yarn, pick up 56 stitches along half the stockinette edge of striped ring--that is, from 80 of the 160 rows. (This joins one end of the yoke to the body of the sweater.)

Work in stockinette, making sure right sides of blue and red/white work face the same way, for 5-1/2". (This will give a total back waist length of 14 inches.)

Neck Opening:
Work 17 sts, join new yarn, bind off 22, work rem 17. Working both sides at once with separate strands of yarn, work 5-1/2" in stock st. With single strand, work first 17 sts, cast on 22, work rem 17. Cut yarn not used in this row. (Square neck opening will be 22" around. Measure intended wearer's head if you adapt neck shaping--kids' heads are bigger than you think.)

Work all sts in stockinette for 5 1/2 more inches. Graft or sew to other half of striped ring's stockinette edge. (Armhole circumference 16-1/2". If a smaller armhole is desired, cast on more stitches for Vertical Stripes and work Yoke to a shorter length before and after Neck Opening.)

Sleeves (make 2):
May be picked up and worked circularly, or worked flat and seamed up.

Pick up/cast on 64 sts with blue yarn (for 16" armhole).

Work stockinette st for 1". Decrease 2 sts, spaced however you like. Continue in stockinette, decreasing 2 sts every 2" and AT THE SAME TIME working color patt: blue for 8", white for 4", red for 4". When sleeve measures 18" long, work knit-1-purl-1 rib with red yarn for 2" over 48 sts. Bind off in rib.

Collar:
May be picked up and worked circularly, or knit flat and seamed/grafted on.

With blue yarn, pick up/CO 100 sts.

Work in k1p1 rib until collar is at least 1-1/2". Bind off in rib.

Do any necessary seaming/grafting. Weave in all ends. You're done! Put on some patriotic music and celebrate.


Variations:
Captain America's costume has a ski mask, with 2 holes for the eyes and one for the mouth/chin, instead of the collar. Unfortunately, I can't find a pattern to link to; the best I can do is direct you to Knitty's Jackyll & Hide and let you adapt it yourself. It's pretty simple.

Cap's costume also has a white capital "A" on the forehead of the mask, a white 5-pointed star on the front of the yoke and another on the back. You can graph these using knitter's graph paper, available for free from various web sites, and duplicate-stitch them on or work them in intarsia.

If you prefer, you can knit the star separately--one pattern is here, there are many others--and sew it on.

This is an original pattern, copyright Maria Grace McClamrock 2008, based on a costume design by Jack Kirby from 1940. This is a fandom tribute and nobody is deriving any profit from it, yadda yadda Yoda.

Thursday, January 17, 2008

Captain America Sweater Pattern


Be sure you read all instructions before beginning. I'm afraid they may be a little jumbled. If you can't make sense of something, leave a comment and I'll try to get back to you.

This makes about a boys' size 8. Instructions for changing the size are given in italics. It's based on a gauge of about 16 stitches to 4" and 23 rows to 4", using worsted-weight yarn and US 9 needles. Don't knock yourself out trying to get gauge--just make sure you know what gauge you're working at, and check the dimensions often.

Yarn: Red Heart Super Saver in White, Cherry Red, and Royal.

Vertical stripes:
Using a provisional cast on and red yarn, CO 36 sts. This gives a length of about 9" from the bottom of the armhole in gauge. Measure the intended wearer and adjust if necessary.

Work as follows:
Row 1: K across
Row 2: P 8, K to end
AT THE SAME TIME working in color pattern: 10 rows red, 10 rows white
until work measures about 28", making sure to finish with 10 white rows. Length of work should be a few inches longer than the waist or chest circumference of the intended wearer, whichever is bigger. I worked 16 stripes.

Graft end of work to provisional CO.
Note: If you prefer not to graft, simply use your preferred cast-on, work as instructed, then bind off and sew ends together.

You should now have a ring of striped stockinette stitch with garter-stitch "ribbing" along one edge. Lay it flat with seam/graft at one edge, to fall under arm, unless it's totally invisible or you don't care.

Yoke:
Using blue yarn, pick up stitches along stockinette edge of stripy piece for half its length. This joins one edge of the yoke to the body of the sweater. I picked up about 7 stitches to every 10-row stripe for a total of 56 stitches over 8 stripes. If you worked more or less than 16 stripes, adjust total number of picked-up stitches.

Work in stockinette (making sure right sides of blue and red/white work face the same way) for 5-1/2". This will give a total back waist length of 14 inches. Adjust as necessary.

Neck Opening:
Work 17 sts, join new yarn, bind off 22, work rem 17. Working both sides at once with separate strands of yarn, work 5-1/2" in stock st. Work first 17 sts, cast on 22, work rem 17. Cut "new" yarn. These instructions will give a square neck opening 22" around. Feel free to adapt neck shaping. Measure intended wearer's head if you do--you'd be amazed how big a small boy's head can be.

Work all sts in stockinette for 5 1/2 more inches. Graft to other half of stripy portion's stockinette edge, or bind off and sew. These Yoke instructions, in gauge, should produce a 16-1/2" circumference armhole. If a smaller armhole is desired, cast on more stitches for Vertical Stripes and work Yoke to a shorter length before and after Neck Opening.

Sleeves (make 2):
If you have circular needles, pick up stitches around armhole. If not, work sleeves flat on straight needles, sew seam, then set in to armholes.

Pick up or cast on 64 sts with blue yarn. This is for 16" armhole. If you changed the armhole size, change number of CO sts to correspond.

Work stockinette st for 1". Decrease 2, spaced however you like. Continue in stockinette, decreasing 2 sts every 2" and AT THE SAME TIME working color patt: blue for 8", white for 4", red for 4". (You should have 48 stitches, unless you changed the armhole size.) Work knit 1, purl 1 rib with red yarn for 2". Bind off in rib.

Collar:
Using blue yarn and circular needles, pick up 22 sts on each side of square Neck Opening for a total of 88 sts
OR
Using straight needles, cast on 88 sts.

Work in k1p1 rib until collar is tall enough. Mine was about 1-1/2". A turtleneck collar should be at least 3". Bind off in rib.

Variations:
If you want to add a mask like Captain America's, simply substitute a ski mask, with 2 holes for the eyes and one for the mouth/chin, instead of the collar. Cap's costume also has a white capital "A" above the eyeholes of the mask, a white star on the front of the yoke and another on the back. You can graph these using knitter's graph paper, available for free from various web sites, and duplicate-stitch them on or work them in intarsia.


If you used circular needles, weave in all ends. You're done.

If you used straight needles, sew sleeve seams, set in sleeves, sew collar seam, sew on collar, and weave in ends. Now you're done.

This is an original pattern, copyright Maria Grace McClamrock 2008, based on a costume design by Jack Kirby from 1940. This is a fandom tribute and nobody is deriving any profit from it, yadda yadda Yoda.

Monday, January 14, 2008

Captain America Sweater (unfinished)


Captain America wip
Originally uploaded by telcontar328

This is what we knitters call a UFO--an UnFinished Object. I just need to sew on the sleeves and knit the collar...

I'll post a more complete pattern when I finish it, but here are the basic specs: Made with Red Heart Super Saver and US size 9 needles. Stripy portion knitted sideways, stockinette stitch with 8 sts in garter stitch along one edge for the "ribbing", then grafted end-to-beginning.

Picked up stitches in blue along half the length of the stockinette edge, worked in stockinette to neck, sts bound off in middle and both "straps" worked at once over shoulders, then cast on new middle sts and worked until back of blue portion was same length as front. (The neck hole is square, in other words. Used a sort of cross between Kitchener and mattress stitch to bind off blue part and join it to other side of stripy part at the same time.

Sleeves: CO in blue, decreased 2 sts after 1 inch and then every 2 inches, changed to white and then red as you see, and finished with 2 inches of k1p1 ribbing after the last decrease. I would have picked up sts and not needed to sew them on, but I didn't have circular needles yet (got them for Christmas, made the sleeves on Christmas Eve.)

Collar: (not pictured) Pick up a suitable number of stitches around the neck edge and work k1p1 rib until tall enough or until you get thoroughly sick of it. Bind off.

This is a fandom tribute and no money is being made from it, yadda yadda Yoda.

Thursday, January 10, 2008

Fireball Guideposts Sweater


fireball sweater
Originally uploaded by telcontar328

This is my favorite colorway of Red Heart Super Saver yarn. It's called Sunshine Print, but I think of it as "fire yarn". The pattern is from Guideposts magazine's Knit for Kids Project--there's a link in the sidebar, under "Patterns and Projects". I haven't yet figured out how to insert links in blog posts written from Flickr!

Self-Striping Argyle Scarf


argyle scarf, originally uploaded by telcontar328.

Believe it or not, this is a simple one-yarn Mistake Rib scarf. I cast on 39 stitches with Red Heart Super Saver yarn, in the Gemstone colorway, then worked each row as follows: "*k2, p2, repeat from * across, end k2, p1" until I ran out of yarn (about 7 ounces' worth). The tension is very important--if you knit loosely, you may need to cast on fewer stitches to get the "argyle" effect. That wonky purple stripe near the top left-hand fold marks where I slacked off my tension for a while.

I'm sure you could get the argyle effect with other self-striping yarns where the color repeats are of uniform length. I just don't have a formula for that yet!

By the way, whether you like Red Heart Super Saver or not, the durability of this yarn is amazing. Some parts of this scarf had been frogged and re-knit six times before this final iteration. (For you non-knitters, "frogging" is knitter's slang for ripping out a project--because we "rip it, rip it, rip it". groan...)